Using White Balance with Spinnaker
What is White Balance?
White Balance is the adjustment of image basis color intensities (Red, Green, and Blue color channels). White Balance is also known as Color Balance or Gray Balance and is used to change the overall appearance of an image, based on various lighting conditions, to reflect what our eyes see.
White balance scales the three color components (RGB) in an image to account for lighting conditions. Lighting conditions play a role in how an image looks.
Why is White Balance Important?
A Raw color image is usually presented as a monochromatic image until all the colors are interpolated. Once converted to a color image via an interpolation method, the image has color. Interpolation is a method of reconstructing color for an entire color image when a subset of the pixel color values are not available. This article does not focus on how interpolation works, but highlights the consequences of interpolating non-white-balanced images.
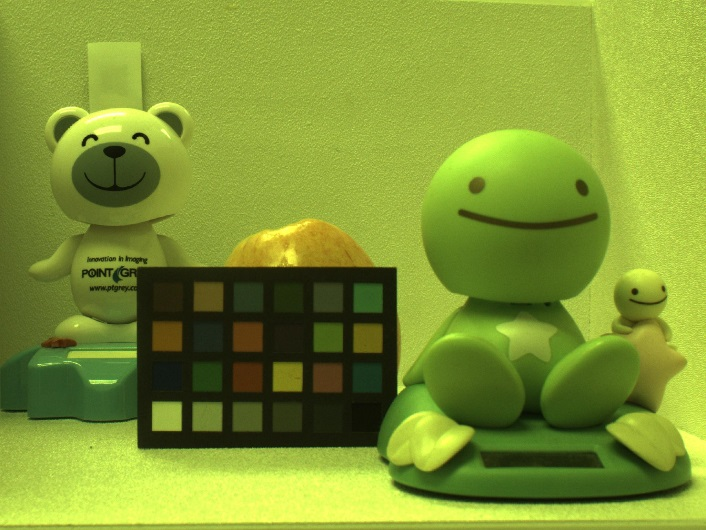
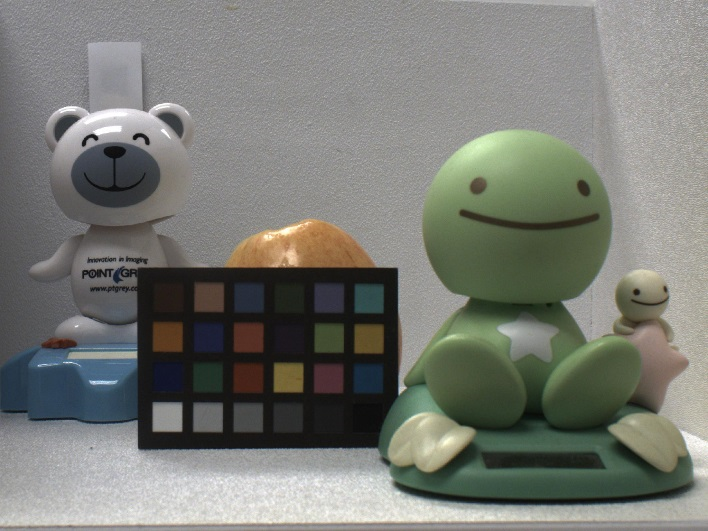
The example below was taken under fluorescent lighting. The image on the left was taken without white balance enabled. The image on the right has white balance applied to adjust the color, compensating for the lighting conditions and providing results that more closely resembles what the human eye sees.
 |
 |
One theory in white balancing is that an image is generally “gray”, meaning that the intensities of the Red, Green and Blue color channels should be roughly equal. This type of color balance is called Gray World Theorem. Fundamentally, unless an image is predominately green, red, or blue this theory typically produces a balanced image.
Image histogram data provides a method of analyzing how close white balance is at making an image closer to human perception. In the examples below, the first image does not have white balance and the second image has white balance applied. The image with white balance enabled shows a more even distribution of intensity for the Red, Green, and Blue color channels.
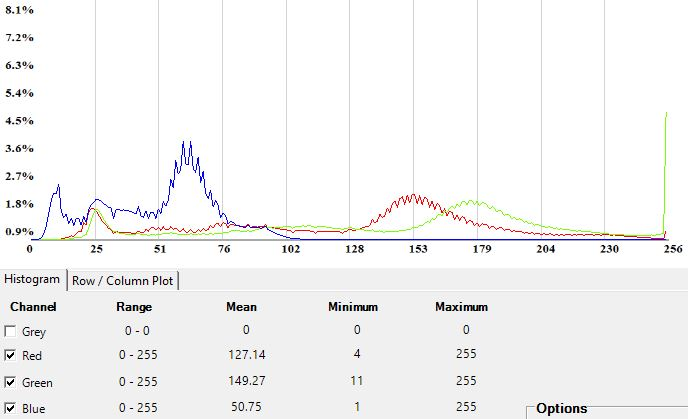

Histogram for image without white balance enabled
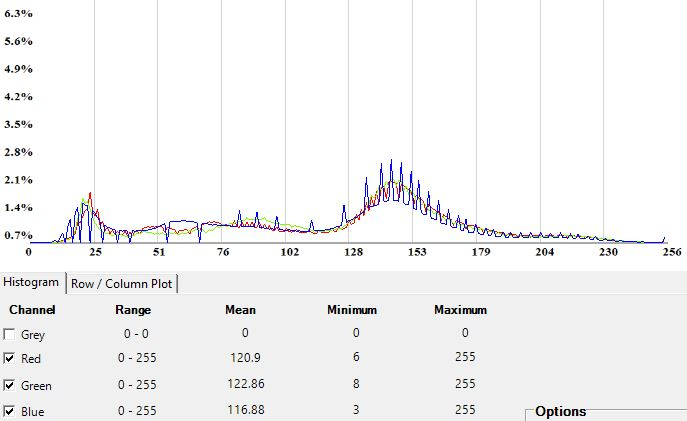
Histogram for image with white balance enabled
How is White Balance Implemented?
There are two ways in which a color channel can be scaled:
- All color channels can have their own scaling coefficient, or,
- Two of the colors can be scaled against a reference
In the first method, to find a scaling coefficient for each color channel, the coefficients are not referenced against the nominal brightness of the image. That is why most white balancing scale two color channels against a color reference. The typical color reference used is green since green is the most dominant Bayer tile color.
The white balancing coefficients can then be written as below:
| a = G / R | b = G / B |
The coefficients can then be calculated by using the average color channel values.
Blackfly S cameras use Green/Red and Green/Blue ratios when calculating white balance.
Automatic White Balance
The Gray World Theorem can be implemented as a linear function algorithm, meaning it is not computationally intensive, and therefore is used onboard the camera to calculate white balance values. Blackfly S cameras use a modified version of the gray world theorem in auto white balance mode. The algorithm sums the Red, Green, and Blue channels and then calculates the appropriate alpha and beta.
Auto white balance can be set to run continuously on image capture to adapt to varying lighting conditions. There are four parameters that can be configured to provide the user with more control over white balance.
- Max and Min Target Ratios—The maximum and minimum ratios for alpha and beta can be configured to ensure that the automatic adjustment doesn’t exceed defined values.
- Damping Constant—The damping constant is ∝e^(1/τ), meaning the larger the damping constant, the slower it will take for the auto white balance to reach steady state. This function is useful for when you have rapidly changing color targets.
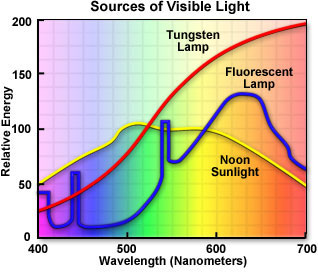
- Light Profile—The lighting profile estimates the emission spectra of the light source and pre-emptively adjusts white balance to ensure the image hue remains representative of what the human eye would see.
- ROI Color Balancing—To color balance based on a specific area in an image, you can window and color balance meter off that ROI and apply the results to the entire image.
How to Enable Auto White Balance
Auto white balance may be enabled in SpinVIew or in the Spinnaker API.
To enable auto white balance using SpinView:
1. Navigate to the Settings tab.
2. Set Balance White Auto to either Continuous or Once.
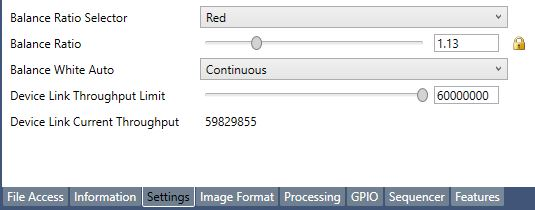

3. Navigate to the Features tab.
4. Select the appropriate white balance auto profile - either indoor or outdoor.
5. Set the upper and lower limit of Auto White Balance.
6. Set the White Balance Auto Damping field to the time constant for the auto feature.
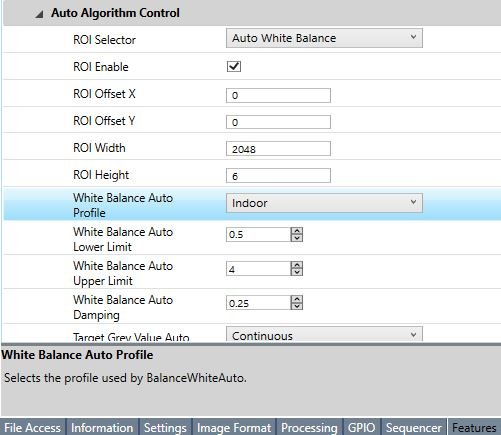

You can optionally use a specific region of interest (ROI) to white balance the entire image. To do so:
- On the Features tab, check ROI Enable.
- Set ROI Selector to Auto White Balance.
- Set ROI Height, Width, and Offset.
To enable auto white balance using Spinnaker API C++:
//Enabling Auto White Balance setting limits and damping constant.
CEnumerationPtr ptrBalanceWhiteAuto = nodeMap.GetNode("BalanceWhiteAuto");
CEnumEntryPtr ptrBalanceWhiteAutoCts = ptrBalanceWhiteAuto->GetEntryByName("Continuous");
ptrBalanceWhiteAuto->SetIntValue(ptrBalanceWhiteAutoCts->GetValue());
CEnumerationPtr ptrBalanceWhiteAutoProfile = nodeMap.GetNode("BalanceWhiteAutoProfile");
CEnumEntryPtr ptrBalanceWhiteAutoProfileIndoor = ptrBalanceWhiteAutoProfile->GetEntryByName("Indoor");
ptrBalanceWhiteAutoProfile->SetIntValue(ptrBalanceWhiteAutoProfileIndoor->GetValue());
CFloatPtr ptrBalanceWhiteAutoLowerLimit = nodeMap.GetNode("BalanceWhiteAutoLowerLimit");
ptrBalanceWhiteAutoLowerLimit->SetValue(0.5);
CFloatPtr ptrBalanceWhiteAutoUpperLimit = nodeMap.GetNode("BalanceWhiteAutoUpperLimit");
ptrBalanceWhiteAutoUpperLimit->SetValue(4.0);
CFloatPtrptrBalanceWhiteAutoDamping = nodeMap.GetNode("BalanceWhiteAutoDamping");
ptrBalanceWhiteAutoDamping->SetValue(0.25);
//Setting White Balance ROI (note that the WB ROI cannot be greater than ROI subsampling on the image.
CBooleanPtr ptrRoiEnable = nodeMap.GetNode("RoiEnable");
ptrRoiEnable->SetValue(1);
CEnumerationPtr ptrAutoAlgorithmSelector = nodeMap.GetNode("AutoAlgorithmSelector");
CEnumEntryPtr ptrAutoAlgorithmSelectorWB= ptrAutoAlgorithmSelector->GetEntryByName("AutoWhiteBalance");
ptrAutoAlgorithmSelector->SetIntValue(ptrAutoAlgorithmSelectorWB->GetValue());
CFloatPtr ptrAasRoiOffsetX = nodeMap.GetNode("AasRoiOffsetX");
ptrAasRoiOffsetX->SetValue(0);
CFloatPtr ptrAasRoiOffsetY = nodeMap.GetNode("AasRoiOffsetY");
ptrAasRoiOffsetX->SetValue(0);
CFloatPtr ptrAasRoiWidth = nodeMap.GetNode("AasRoiWidth");
ptrAasRoiOffsetX->SetValue(2048);
CFloatPtr ptrAasRoiHeight = nodeMap.GetNode("AasRoiHeight");
ptrAasRoiOffsetX->SetValue(6);
How to Manually Adjust White Balance Ratios
The white balance ratios may be adjusted in SpinView or by using the Spinnaker API.
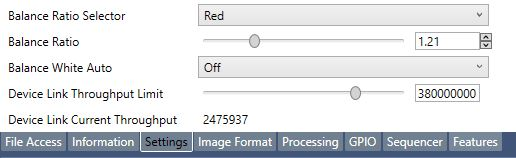
To adjust white balance using SpinView:
- Navigate to the Settings tab.
- Turn off Balance White Auto.
- Select the appropriate Balance Ratio Selector and change the value in Balance Ratio. Selecting Red in the Balance Ratio changes a and selecting Blue changes b.
To enable manual white balance using Spinnaker API C++:
// Retrieve nodes for manually adjusting white balance settings.
CEnumerationPtr ptrBalanceWhiteAuto = nodeMap.GetNode("BalanceWhiteAuto");
CEnumEntryPtr ptrBalanceWhiteAutoOff = ptrBalanceWhiteAuto->GetEntryByName("Off");
ptrBalanceWhiteAuto->SetIntValue(ptrBalanceWhiteAutoOff->GetValue());
CEnumerationPtr ptrBalanceRatioSelector = nodeMap.GetNode("BalanceRatioSelector");
CEnumEntryPtr ptrBalanceRatioSelectorRed = ptrBalanceRatioSelector->GetEntryByName("Red");
ptrBalanceRatioSelector->SetIntValue(ptrBalanceRatioSelectorRed->GetValue());
CFloatPtr ptrBalanceRatio = nodeMap.GetNode("BalanceRatio");
ptrBalanceRatio->SetValue(1.5);